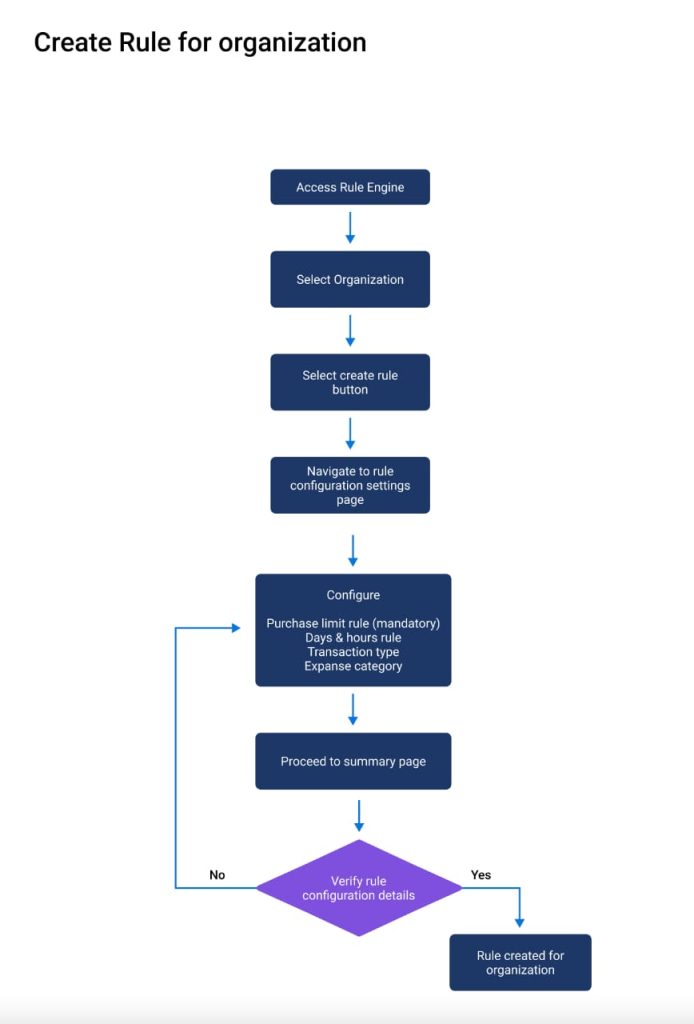
Rule Creation for an Organization
As an EASI/EPMS admin, you are empowered to create and manage rules for organizations onboarded to EASI. This process begins by accessing the Rule Engine module, conveniently located in the top navigation header. If no rules are configured for an organization, a “Create Rule” button will be available. Clicking this button takes you to the Rule Configuration Settings page.
Rule Configuration Settings Page
The Rule Configuration Settings page features a left navigation menu with four rule configurations:
- Purchase Limit Rule (Mandatory)
- Days & Hours Rule
- Transaction Type Rule
- Expense Category Rule
Purchase Limit Rule (Mandatory)
The Purchase Limit Rule defines the following parameters:
- Maximum Purchase Limit Per Transaction: The maximum allowable amount for each transaction.
- Maximum Purchase Limit Over Time: The maximum allowable total amount over a predefined period (default: monthly).
- Period: Currently set to monthly by default and cannot be changed.
Key Points:
- The Purchase Limit Rule is mandatory.
- The Maximum Purchase Limit Per Transaction must not exceed the Maximum Purchase Limit Over Time.
- Configuring the Purchase Limit Rule unlocks the remaining rules for configuration.
Days & Hours Rule Configuration
In the Days & Hours Rule configuration, you can define specific days and hours to block transactions. This section includes two tabs:
Weekdays Tab
- Displays Monday through Friday.
- Select specific dates and block corresponding hours via the “Hours” section.
- Use a toggle switch to enable or disable all hours for selected dates at once.
- A checkbox for “Non-Office Hours” allows you to block transactions from 5:00 PM to 8:00 AM.
Weekends Tab
- Displays Saturday and Sunday.
- By default, all hours are blocked for selected weekend dates.
Transaction Type Rule Configuration
This rule lets you block specific transaction types, such as:
- Goods & Services
- Cash Withdrawal
Once a transaction type is selected, all corresponding transactions will be restricted, providing precise control over transaction permissions.
Expense Category Rule Configuration
The Expense Category Rule allows you to:
- Specify permitted transactions for certain merchants and categories.
- Configure Merchant Category Codes (MCCs) and Merchant IDs (MIDs) for detailed control.
Expense Category Settings
First-Level Settings
- Standard Allow: Select merchant categories allowed for transactions at the organization level.
- Custom Allow: Configure custom settings for categories.
- Custom Allow: Access all available categories. Clicking a “Configure” link opens the Custom Allow Settings popup.
Custom Allow Settings
MCC Settings
- Browse categories in a tab-based interface.
- Select MCCs from a clear list with descriptions.
- Proceed to the MID Settings page using the “Proceed to MID Settings” button.
MID Settings
- Configure up to four MIDs per selected MCC.
- Use the “Skip All MID” switch to bypass this step if needed.
Second-Level Settings (Optional)
- Available after completing first-level settings.
- Configure additional parameters, including:
- Number of Transactions
- Budget
- Duration (Monthly/Yearly)
- Apply or reset configurations for each category.
Rule Configuration Summary Page
Once all rules are set, proceed to the Rule Configuration Summary page. Here, you can:
- Review all configured rules.
- Navigate back to the configuration page for modifications using the “Back to Settings” button.
- Click Create Rule to trigger an API call and finalize rule creation for the organization.
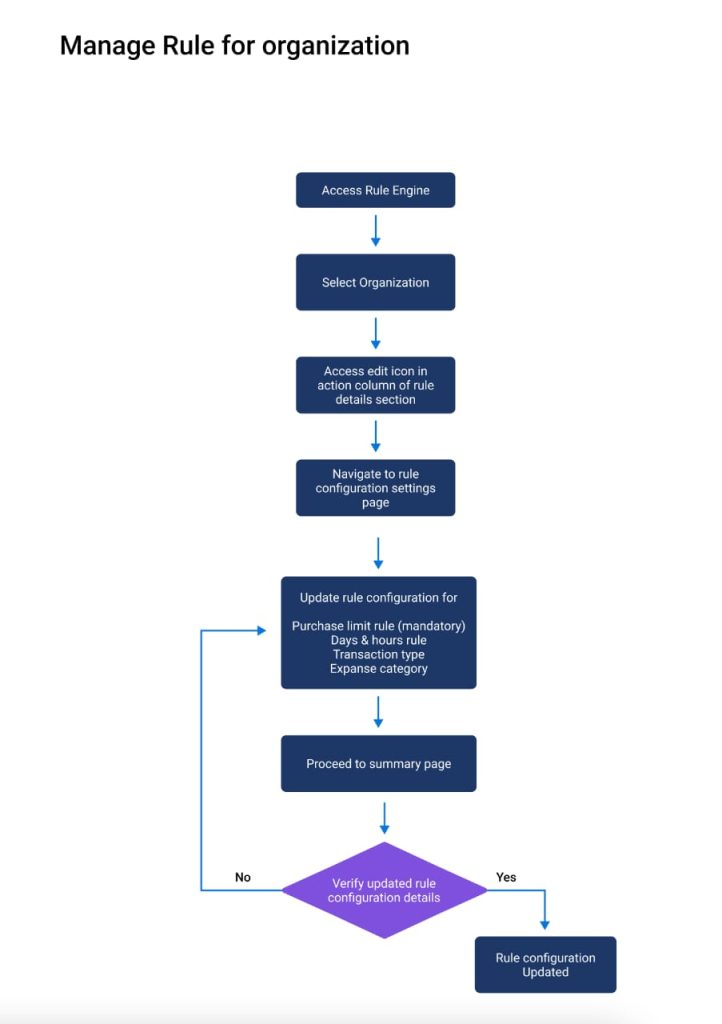
Editing Rule Configurations for an Organization
As an EASI/EPMS admin, you can easily view, update, and manage rule configurations for an organization. This guide walks you through the steps to access and edit rule configurations, view configured rules, and export them if needed.
Accessing the Rule Engine Module
To begin, navigate to the Rule Engine module from the top navigation bar on the landing page. This will take you to the Rule Details section, where you can:
- View an overview of the organization’s rule configurations.
- Access options to view, download, or edit rule configurations.
Rule Details Section
The Rule Details section displays:
- Organization Name: The name of the organization.
- Total Configured Rules: The total number of rules configured for the organization.
- Date of Creation: The date the organization was created.
- Latest Edit: The date and time of the most recent update.
- Action Options: Icons to view, download, or edit rule configurations.
Editing Rule Configurations
To edit a rule configuration:
- In the Action column of the Rule Details section, click the Edit icon. This redirects you to the Rule Configuration Settings page.
- Update the required rule configurations. By default, the Purchase Limit Rule will be selected, and its details will be displayed.
- Navigate to other rules as needed and make updates.
- After making all necessary changes, click the Proceed to Summary Page button to review the summary of your updates.
- Finally, click the Update Rule button to save your changes for the organization.
Viewing Configured Rules
To view the current rules configured for an organization:
- In the Action column of the Rule Details section, click the View icon.
- This will take you to the Rule Configuration Settings page, where all the configured rules are displayed.
Exporting Rule Configurations
To export the configured rules for an organization:
- In the Action column of the Rule Details section, click the Download icon.
- This will download the configured rules as a file, which can be saved to your device for reference or sharing.
Rule Configuration Summary Page
Once you have updated the configurations:
- Navigate to the Rule Configuration Summary page to review all updated rules.
- If further modifications are needed, use the Back to Settings button to return to the configuration page.
- To finalize the configurations, click the Update Rule button.